Automotive glass fabrication has moved far beyond cutting a flat sheet and fitting it into a frame. Modern windscreens must simultaneously support ADAS cameras, project heads-up display imagery, damp road noise, manage solar heat gain, and bear structural loads in a rollover. Getting any one of those functions wrong compromises the others. This automotive glass fabrication guide addresses that challenge directly, covering material selection, advanced shaping methods, lamination, quality verification, and troubleshooting for engineers and designers who need specifics, not generalities.
Table of Contents
- Key takeaways
- Prerequisites and materials in automotive glass fabrication
- Advanced glass shaping techniques
- Lamination and bonding processes
- Quality control and verification
- Troubleshooting common fabrication challenges
- My perspective on where automotive glazing is heading
- Precision glass solutions for automotive fabrication
- FAQ
Key takeaways
| Point | Details |
|---|---|
| Material selection drives everything | Specify interlayer type (PVB, acoustic, solar control) before shaping to align fabrication parameters with functional requirements. |
| Press bending outperforms sag bending | For complex 3D curvatures required by modern windscreens, press bending delivers superior shape fidelity and lower optical distortion. |
| De-airing is a critical checkpoint | Failures at the nip roller or vacuum bagging stage produce defects that are only visible after costly autoclave curing. |
| Quality verification must be multi-modal | Optical, dimensional, and surface checks must all be performed; no single test confirms readiness for ADAS or HUD applications. |
| ECE R43 head-form testing is non-negotiable | Windscreen performance under head-form impact must be verified; removing this requirement risks occupant safety across multiple crash scenarios. |
Prerequisites and materials in automotive glass fabrication
Every fabrication decision traces back to material specification. Getting this wrong creates problems that no amount of downstream process control can fully correct.
Glass types and interlayer selection
Automotive glazing falls into two primary categories: laminated glass and tempered glass. Laminated construction, typically two plies of float glass bonded with a polymer interlayer, is mandatory for windscreens in most markets because PVB interlayers absorb impact energy and prevent shattering. Tempered glass, which fractures into small granular pieces, is standard for side and rear windows where lamination is not required.
The interlayer you specify defines the glass unit’s secondary functions. Standard PVB handles basic adhesion and impact containment. Acoustic interlayers add a softer viscoelastic core that reduces noise transmission by several decibels, which matters considerably for electric vehicles where powertrain noise no longer masks road and wind noise. Solar control interlayers incorporate infrared-reflective additives that reduce cabin heat gain without darkening the glass optically. Specialised interlayers reduce solar heat gain and improve noise damping simultaneously, making them the preferred specification for panoramic roofs where thermal and acoustic demands are highest.
Material properties overview
The table below summarises the principal glass and interlayer types alongside their performance characteristics for automotive applications.
| Material | Primary function | Key property | Typical application |
|---|---|---|---|
| Float glass (annealed) | Base substrate | Flat, high optical clarity | Lamination stock |
| Tempered glass | Side/rear glazing | High surface compression, granular break | Door glass, rear screens |
| Standard PVB | Windscreen lamination | Impact adhesion, transparency | Windscreens, roof glass |
| Acoustic PVB | Noise damping | Viscoelastic core, reduced sound transmission | EV windscreens, panoramic roofs |
| Solar control PVB | Thermal management | IR reflectance, colour neutrality | Panoramic roofs, large glazing |
| Ionoplast interlayer | Structural glazing | High stiffness, post-breakage retention | Structural windscreens, thin glass stacks |
Preparation before fabrication
Before any shaping begins, glass blanks require thorough washing and drying in a controlled environment. Particles as small as 20 microns can cause visible inclusions or delamination. Assembly areas should be climate controlled at 20 to 22 degrees Celsius with relative humidity kept below 25 percent, particularly during interlayer lay-up. Automotive glass manufacturing processes including precision cutting, hot forming, and encapsulation all depend on contamination-free surfaces to achieve the required performance and durability. Pre-cut blanks must also be inspected for edge damage that could propagate during bending.
Advanced glass shaping techniques
Shape accuracy in modern automotive glass is not a cosmetic concern. It directly affects HUD image quality, ADAS sensor alignment, and the precision of adhesive bonding at installation.
Press bending versus sag bending
Sag bending, where a flat glass blank is placed on a mould ring and allowed to slump under gravity in a furnace, remains adequate for simple curvatures. For complex double-curvature profiles found in modern windscreens and panoramic roofs, it falls short. Press bending achieves superior shape fidelity and reduced optical distortion compared to sag bending. A press bending line uses matched upper and lower moulds to mechanically form the softened glass, giving engineers precise control over curvature in both axes simultaneously.
The difference in optical performance between the two methods becomes critical when the glass must support HUD projection. Any deviation in surface flatness introduces distortion in the reflected image, which is particularly problematic for augmented reality HUD systems that project information at distances greater than ten metres. For these applications, press bending is the required approach, not just the preferred one.
Other forming methods
Beyond press and sag bending, several other forming methods appear in automotive glass production:
- Gravity bending on shaped mould rings suits moderate compound curvatures and lower production volumes.
- Vacuum moulding draws softened glass onto a porous mould using negative pressure, useful for asymmetric shapes where mechanical pressing would cause surface marking.
- Hot forming encompasses a broader category of high-temperature processes used for complex architectural profiles increasingly adopted in automotive roof glass.
Technical considerations across all methods include uniform furnace temperature profiles, mould material selection to prevent surface pick-up marks, and controlled cooling rates to avoid residual stress that compromises tempering or subsequent lamination.
Pro Tip: When designing press bending moulds, factor in the glass springback coefficient for your specific composition. A mould that matches the target geometry exactly will produce glass that undershoots the required curvature. Build in a small overcorrection based on measured springback data from your material supplier.
Lamination and bonding processes
Lamination is where the individual glass and interlayer components become a single engineered composite. Each stage in the process has a direct effect on the finished product’s optical clarity, structural integrity, and long-term durability.
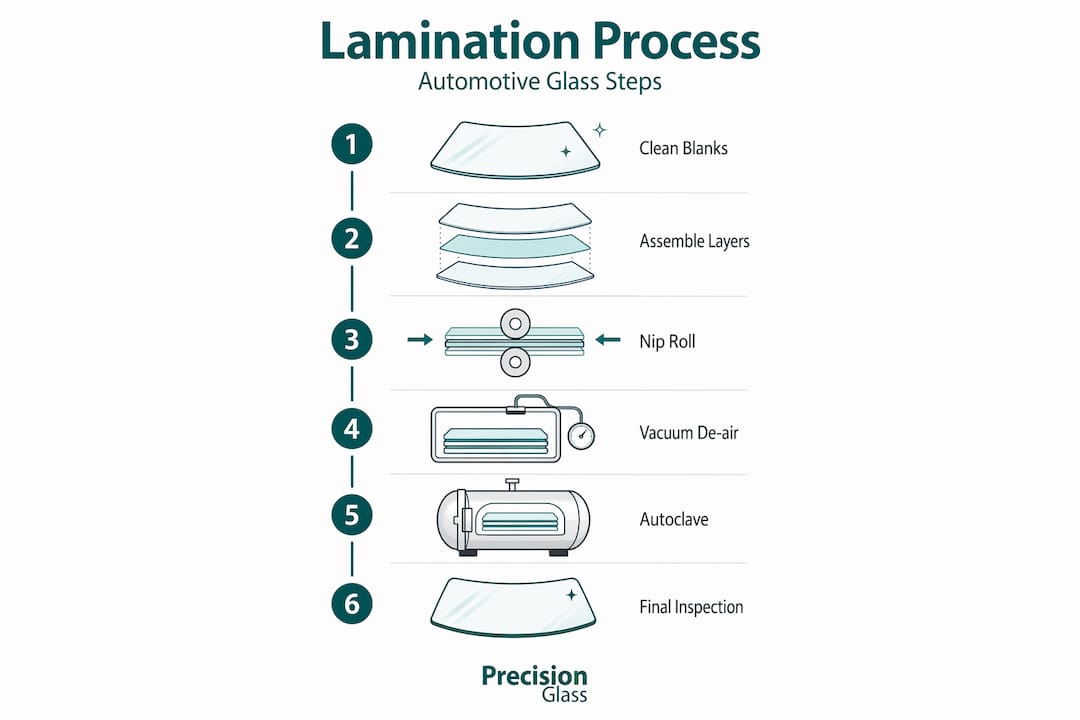
Step-by-step lamination process
- Interlayer lay-up. Place the PVB or alternative interlayer sheet onto the shaped inner glass ply in the climate-controlled assembly room. Trim excess interlayer flush with the glass edge, leaving a small controlled overhang if specified.
- Outer ply placement. Position the outer glass ply precisely onto the interlayer. Alignment must be within half a millimetre; misalignment creates optical steps visible in reflected light.
- Nip roller de-airing. Pass the assembly through heated nip rollers at approximately 70 degrees Celsius. This stage partially bonds the interlayer and expels the majority of trapped air from the interface. Failure at the nip roller stage often results in defects only visible after costly autoclave curing.
- Vacuum bagging (optional but recommended). For complex shapes or large glazing panels, vacuum bagging after nip rolling provides additional de-airing, particularly at edges and compound curve zones where air pockets form most readily.
- Autoclave curing. Load the assembly into the autoclave. Autoclave parameters of approximately 140°C and 10 to 15 bar pressure transform the layered assembly into a stable composite with a uniform bond across the full surface area.
- Cooling and inspection. Cool the laminate under controlled pressure to prevent delamination during the glass transition phase of the interlayer. Inspect immediately after removal.
The table below shows how key lamination variables affect quality outcomes.
| Variable | Effect on quality | Risk if outside range |
|---|---|---|
| Nip roller temperature | Partial interlayer bonding, air expulsion | Retained air at interface, edge bubbles |
| Autoclave temperature | Interlayer flow and final adhesion | Under-cure (delamination) or over-cure (yellowing) |
| Autoclave pressure | Void compression, thickness uniformity | Residual voids, optical distortion |
| Assembly humidity | Interlayer adhesion level | Moisture blistering, optical haze |
| Cooling rate | Internal stress in composite | Edge delamination, stress cracking |
Pro Tip: If your post-autoclave inspection consistently reveals edge delamination on complex curved parts, check the vacuum bagging seal integrity before attributing the cause to autoclave parameters. Edge geometry creates natural air traps that vacuum bagging addresses more effectively than nip rolling alone.
Quality control and verification
A finished laminated windscreen carries structural and sensor-support responsibilities that make thorough quality verification non-negotiable. Verification must span optical, dimensional, and adhesion properties.
Safety testing standards
Head-form testing requirements under UN Regulation ECE R43 confirm that the windscreen provides occupant protection in crash scenarios independent of airbag deployment. This test cannot be replaced by modelling alone. Regulatory discussions around removing the requirement have highlighted that windscreens serve a protective role in scenarios where restraint systems fail or are not in use. Any fabrication programme must validate compliance with ECE R43 as a release condition, not an afterthought.
Optical and sensor compatibility verification
For ADAS cameras, lidar, and HUD systems, windscreens must meet stringent optical criteria covering refractive power, optical distortion, and thickness uniformity across the sensor zone. Test methods include:
- Shadowgraph or Moire fringe analysis to map optical distortion across the full aperture.
- Thickness measurement using ultrasonic or laser interferometry at defined grid points across the sensor integration zone.
- HUD reflection uniformity testing using a calibrated collimator to detect localised curvature errors.
- Transmittance and haze measurement to confirm interlayer clarity remains within specification.
Continuous in-line optical inspection systems detect surface defects, inclusions, and dimensional deviations in real-time during production, enabling rejection before the part reaches final assembly rather than after.
Well-documented quality records are as important as the tests themselves. When a field failure occurs, traceability back to autoclave batch, interlayer lot, and forming mould enables rapid root cause identification and prevents recurrence across the production population.
Troubleshooting common fabrication challenges
Even well-controlled processes produce defects. Knowing where to look and what to adjust saves significant rework cost.
The most frequent fabrication problems and their primary causes are:
- Air entrapment (bubbles). Usually traced to insufficient de-airing at the nip roller stage, humidity above specification during lay-up, or interlayer contamination. Corrective action: review assembly room conditions and increase vacuum bagging duration.
- Optical distortion. Caused by uneven furnace temperature profiles during bending, mould surface contamination, or inadequate cooling rate control. Corrective action: map furnace temperature uniformity and clean mould surfaces between runs.
- Uneven lamination (dry areas or delamination). Often linked to incorrect interlayer storage. PVB is hygroscopic and absorbs moisture from the air if stored or conditioned incorrectly, which reduces adhesion. Corrective action: control interlayer conditioning time and verify storage conditions.
- Edge sealing failures. Particularly common with acoustic interlayers, which are softer and more prone to cold flow at exposed edges. Corrective action: apply edge sealing tape immediately after trimming and verify autoclave pressure uniformity.
Pro Tip: Run a small-batch trial whenever you change interlayer supplier or lot, even if the specification appears identical. Adhesion values and flow characteristics can vary enough between manufacturing batches to shift your autoclave parameters outside the validated range.
Emerging multifunctional glass designs, incorporating integrated heating elements, electrochromic coatings, and embedded antenna films, introduce additional failure modes at every layer interface. Fabrication programmes for these products require individual process validation for each functional layer, not simply an extension of the base lamination process.
My perspective on where automotive glazing is heading
I’ve worked across precision glass fabrication for long enough to see automotive glass move from being the least technically demanding glazing category to one of the most demanding. The shift happened faster than many engineers anticipated. Automotive glass is evolving from a passive safety barrier into a multifunctional engineered system that is integral to vehicle comfort, efficiency, and safety.
What I find consistently underestimated is the optical precision burden that ADAS places on the entire fabrication chain. It is not just the HUD zone that needs tight thickness control. Every camera and lidar aperture imposes its own specification, and those specifications are not always coordinated at the design stage. Engineers receive glass drawings with sensor zones added late, which forces fabrication process reviews that should have happened months earlier.
My practical advice: involve the glazing fabrication team at the vehicle architecture stage, not the tooling stage. Decisions about glass curvature, interlayer stack, and edge geometry made early are low-cost. The same decisions made after moulds are built are very expensive. The glass component design process rewards this kind of front-loaded collaboration.
— Alexandra
Precision glass solutions for automotive fabrication
Glassprecision works directly with automotive engineers and designers who need fabrication expertise matched to exacting technical specifications.
Our technical glass catalogue covers optical-grade substrates, functional interlayer combinations, and finished laminated components tailored for automotive dashboard, windscreen, and glazing applications. The Glassprecision fabrication process guide details our approach to shaping, lamination, and quality verification for safety-critical parts. For programmes requiring customised optical properties, specialised coatings, or compliance with ECE R43 and equivalent standards, our engineering team is available to review your requirements and propose a fabrication solution built around your design constraints. Contact Glassprecision to discuss your automotive glazing specification.
FAQ
What is the difference between press bending and sag bending?
Press bending uses matched upper and lower moulds to mechanically form heated glass, delivering higher shape accuracy and lower optical distortion than sag bending, which relies solely on gravity. Press bending is required for complex 3D windscreen profiles and HUD-compatible glazing.
Why is de-airing so critical in laminated windscreen production?
Trapped air at the glass-interlayer interface produces bubbles that compromise both optical clarity and structural integrity. De-airing at the nip roller and vacuum bagging stages must be completed before autoclave curing, because defects are far more difficult and costly to address after the bond has formed.
What autoclave parameters are used for automotive laminated glass?
Standard automotive lamination uses autoclave temperatures of approximately 140°C and pressures of 10 to 15 bar. These conditions drive complete interlayer flow and eliminate residual voids to produce a uniform, durable composite bond.
What does ECE R43 require for windscreen fabrication?
ECE R43 mandates head-form impact testing to confirm occupant protection independent of airbag deployment. All windscreens must be validated against this regulation before release, as it covers crash scenarios where restraint systems may not be functional.
How do ADAS requirements affect glass fabrication tolerances?
ADAS cameras, lidar, and HUD systems require windscreens with tightly controlled optical distortion, refractive power, and thickness uniformity across defined sensor zones. These requirements push thickness and curvature tolerances beyond what standard automotive glass specifications historically demanded, making in-line optical inspection and post-fabrication sensor-zone verification mandatory steps in the production process.